尤斯塔斯·基德

前言
此文章接上一篇 从0到1部署一个云服务站点需要哪些步骤, 本文记录了一个站点绑定域名的完整操作过程,遇到的问题,分析步骤,以及一些思路等
域名绑定公网IP
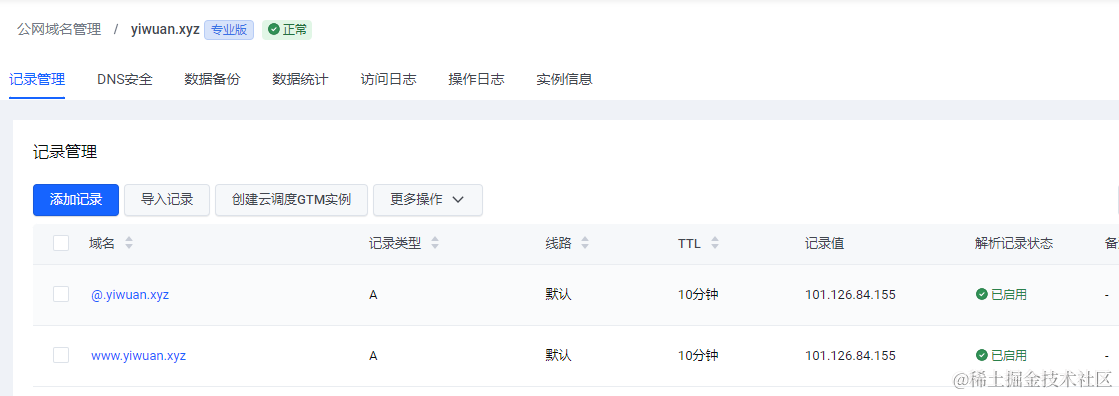
在购买域名的对应服务商后台中,绑定域名到云服务器厂商提供的公网IP,并设置状态为启动

绑定域名到80端口
在 nginx.conf 文件中,在 http 设置中添加 server 配置, 将 server_name 设置成 自己的域名地址,设置 listen 为 80,设置 root 资源路径为对应的站点文件,如下设置
1
2
3
4
5
6
7
8
9
10
11
12
13
14
15
16
17
18
19
|
http {
    server {
        listen       80;
        server_name  yiwuan.xyz;
        location / {
            root   /xxx/xxx/public;
            index  index.html;
            try_files $uri $uri/ /index.html;
        }
        location = /index.html {
            root   /html/xxx/xxx;
        }
        error_page   500 502 503 504  /50x.html;
        location = /50x.html {
            root   /usr/share/nginx/html;
        }
    }
}
|
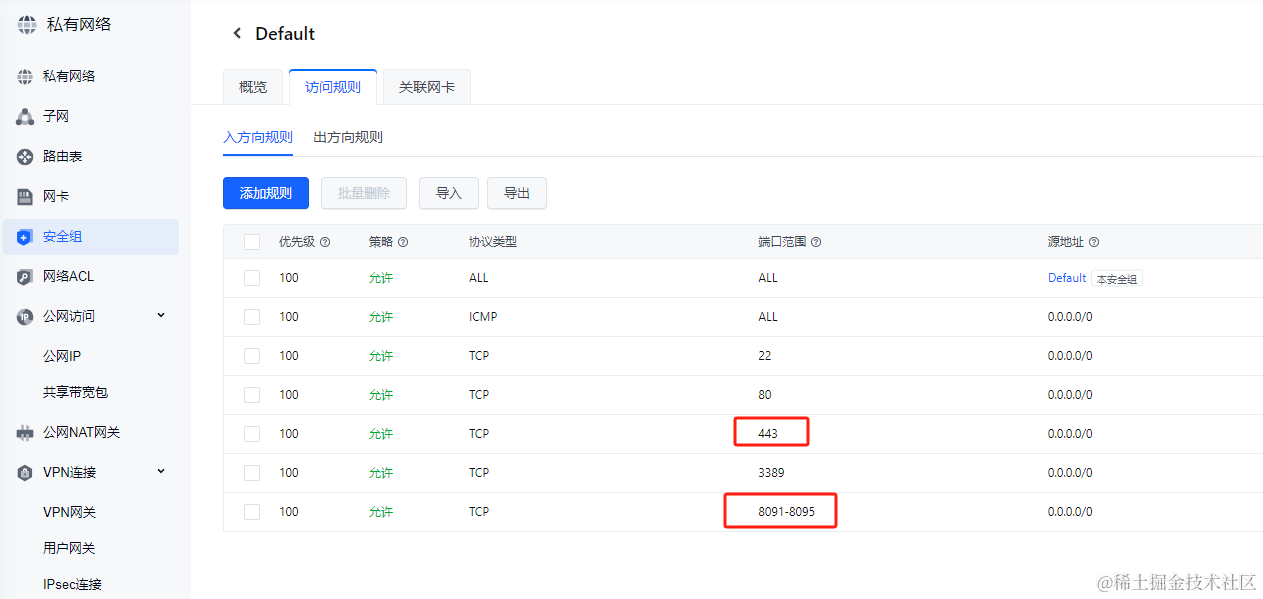
在云服务的后台中,开放 80 端口

添加好配置后执行 nginx -s reload 重启 nginx 服务,在浏览器上输入配置的域名 yiwuan.xyz,回车查看效果

能正常通过域名访问说明域名配置就成功了
设置证书安全访问
目前站点已经可以通过 http://yiwuan.xyz 地址进行访问了,浏览器提示不安全,是因为没有添加对应的域名证书
在域名服务商那里下载对应服务器的证书,我这里的服务器是 nginx,下载 nginx 对应的证书文件
将 nginx 证书文件先下载到本地 Win11 系统 ,然后使用 scp 传到 CentOS 服务器
1
| scp .\yiwuan.xyz_nginx.tar root@ip:/xxx/xxx/yiwuan.xyz/
|
找到你上传的tar归档文件所在的目录,然后使用 tar 命令解压归档文件,然后将 pem , key 文件移动到指定位置
1
| tar -xvf yiwuan.xyz_nginx.tar
|
添加443端口,并设置证书地址
添加一个 server 配置,如下内容
1
2
3
4
5
6
7
8
9
10
11
12
13
14
15
16
17
18
19
20
21
22
23
24
25
26
27
28
29
30
31
32
33
34
35
36
37
| server {
listen 443 ssl;
server_name yiwuan.xyz;
ssl_certificate /xxx/xxx/yiwuan.xyz.pem; # SSL证书文件路径
ssl_certificate_key /xxx/xxx/yiwuan.xyz.key; # SSL证书密钥文件路径
ssl_session_timeout 5m;
ssl_protocols TLSv1 TLSv1.1 TLSv1.2;
ssl_ciphers HIGH:!aNULL:!MD5;
ssl_prefer_server_ciphers on;
location / {
proxy_pass http:
proxy_set_header Host $host;
proxy_set_header X-Real-IP $remote_addr;
proxy_set_header X-Forwarded-For $proxy_add_x_forwarded_for;
proxy_set_header X-Forwarded-Proto $scheme;
root /html/xxx/xxx;
index index.html;
try_files $uri $uri/ /index.html;
}
location = /index.html {
root /html/xxx/xxx;
}
error_page 500 502 503 504 /50x.html;
location = /50x.html {
root /usr/share/nginx/html;
}
# gzip
gzip on;
gzip_types text/plain text/css application/json application/javascript text/xml application/xml application/xml+rss text/javascript;
gzip_proxied any;
gzip_vary on;
}
|
检查防火墙状态
我这里使用的 firewalld 防火墙,运行以下命令查看状态
输出 running 表示防火墙正在运行,状态正常
设置允许HTTPS流量
对于 firewalld ,运行以下命令添加服务
1
| firewall-cmd --zone=public --add-service=https --permanent
|
修改配置后,重启 firewalld 防火墙
出现一个错误
设置完允许HTTPS流量后在浏览器中访问 https://yiwuan.xyz 域名地址报错,提示当前页面不可访问

使用 cat /var/log/nginx/access.log 命令查看 nginx 的服务端的输出日志

关键信息似乎就一个 502,没有其他更多的信息了
查看云服务后台的安全组端口配置,入方向规则里面开了 443 和对应的代理端口 80

查看云服务 CentOS 系统的防火墙HTPPS端口是否开启
1
| firewall-cmd --zone=public --list-services
|
输出 cockpit dhcpv6-client https ssh,里面包含 https 说明 firewalld 中已成功开启 443 端口(HTTPS端口)
资料补充
cockpit, dhcpv6-client, https, ssh 分别表示以下内容:
cockpit: 一个基于Web的服务器管理工具,用于管理和监控Linux服务器dhcpv6-client: DHCPv6客户端,用于IPv6网络中的动态主机配置协议https: HTTPS是一种安全的超文本传输协议,用于在网络上安全地传输数据ssh: SSH是安全外壳协议,用于通过加密通道在网络上安全地访问和管理远程计算机
这些术语分别代表服务器管理工具、IPv6 DHCP客户端、安全的HTTP传输协议和安全的远程访问协议
内网测试域名通不通
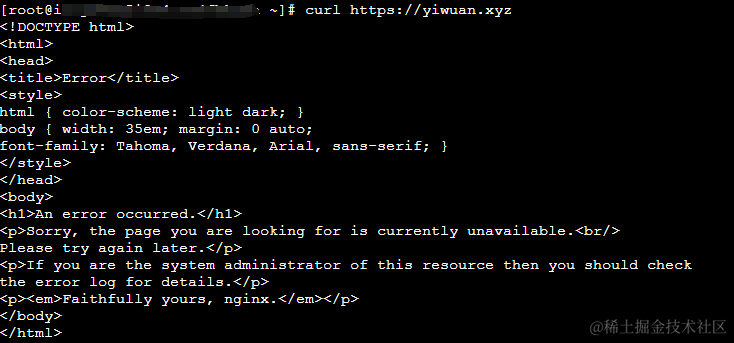
使用 curl https://yiwuan.xyz 发现结果和在客户端浏览器得到的内容一样

ping 了一下域名后测试,域名是通的
使用 curl 在内网测试一下域名代理的 IP 地址 localhost:80 效果

直接提示 Connection refused,说明是服务端的配置方式有问题了
查看了一下 nginx.conf 中的配置,原来配置 443 后就把 localhost:80 这个 server 配置给删了,把 80 的配置恢复一下,然后再把 443 这个域名配置代理指向 80 这个配置,改成如下效果
1
2
3
4
5
6
7
8
9
10
11
12
13
14
15
16
17
18
19
20
21
22
23
24
25
26
27
28
29
30
31
32
33
34
35
36
37
38
39
40
41
42
43
44
45
46
47
48
49
50
51
52
| ...
server {
listen 80;
server_name localhost;
location / {
root /html/xxx/xxx;
index index.html;
try_files $uri $uri/ /index.html;
}
location = /index.html {
root /html/xxx/xxx;
}
error_page 500 502 503 504 /50x.html;
location = /50x.html {
root /usr/share/nginx/html;
}
# gzip
gzip on;
gzip_types text/plain text/css application/json application/javascript text/xml application/xml application/xml+rss text/javascript;
gzip_proxied any;
gzip_vary on;
}
server {
listen 443 ssl;
server_name yiwuan.xyz;
ssl_certificate /etc/letsencrypt/live/yiwuan.xyz/yiwuan.xyz.pem; # SSL证书文件路径
ssl_certificate_key /etc/letsencrypt/live/yiwuan.xyz/yiwuan.xyz.key; # SSL证书密钥文件路径
ssl_session_timeout 5m;
ssl_protocols TLSv1 TLSv1.1 TLSv1.2;
ssl_ciphers HIGH:!aNULL:!MD5;
ssl_prefer_server_ciphers on;
location / {
proxy_pass http:
proxy_set_header Host $host;
proxy_set_header X-Real-IP $remote_addr;
proxy_set_header X-Forwarded-For $proxy_add_x_forwarded_for;
proxy_set_header X-Forwarded-Proto $scheme;
}
# gzip
gzip on;
gzip_types text/plain text/css application/json application/javascript text/xml application/xml application/xml+rss text/javascript;
gzip_proxied any;
gzip_vary on;
}
|
再次测试 https://yiwuan.xyz 域名,效果正常了

设置 www.yiwuan.xyz 自动跳转到 https 地址
单独加一个 server 配置,并重定向指向 https 的地址,如下设置
1
2
3
4
5
| server {
listen 80;
server_name www.yiwuan.xyz;
return 301 https:
}
|
在浏览器中输入 www.yiwuan.xyz 自动跳转成 https://www.yiwuan.xyz 说明配置就成功了

设置 http 自动跳转到 https
添加一个 server 配置,再次设置重定向指向 https 的地址
1
2
3
4
5
| server {
listen 80;
server_name yiwuan.xyz;
return 301 https:
}
|
注意!$host 是变量,和 yiwuan.xyz 一个效果,如下配置
1
2
3
4
5
| server {
listen 80;
server_name yiwuan.xyz;
return 301 https:
}
|
在浏览器中输入 http://yiwuan.xyz 地址自动变成 https://yiwuan.xyz 说明配置成功了
最终配置如下
1
2
3
4
5
6
7
8
9
10
11
12
13
14
15
16
17
18
19
20
21
22
23
24
25
26
27
28
29
30
31
32
33
34
35
36
37
38
39
40
41
42
43
44
45
46
| ...
server {
listen 80;
server_name www.yiwuan.xyz;
return 301 https:
}
server {
listen 80;
server_name yiwuan.xyz;
return 301 https:
}
server {
listen 443 ssl;
server_name yiwuan.xyz;
ssl_certificate /etc/letsencrypt/live/yiwuan.xyz/yiwuan.xyz.pem; # SSL证书文件路径
ssl_certificate_key /etc/letsencrypt/live/yiwuan.xyz/yiwuan.xyz.key; # SSL证书密钥文件路径
ssl_session_timeout 5m;
ssl_protocols TLSv1 TLSv1.1 TLSv1.2;
ssl_ciphers HIGH:!aNULL:!MD5;
ssl_prefer_server_ciphers on;
location / {
root /html/xxx/xxx;
index index.html;
try_files $uri $uri/ /index.html;
}
location = /index.html {
root /html/xxx/xxx;
}
error_page 500 502 503 504 /50x.html;
location = /50x.html {
root /usr/share/nginx/html;
}
# gzip
gzip on;
gzip_types text/plain text/css application/json application/javascript text/xml application/xml application/xml+rss text/javascript;
gzip_proxied any;
gzip_vary on;
}
...
|
总结一下
在进行 nginx 配置时遇到的小问题也不少,有时候网上查到的资料,别人那样设置行,放到自己这里就不行,结合官方文档和网上找到的资料多尝试,并做好记录,执行完 nginx -s reload 命名后多等一会儿再去无痕浏览器中测试,否则可能会有缓存问题导致配置不生效情况
欢迎大家讨论交流,如果喜欢本文章或感觉文章有用,动动你那发财的小手点赞、收藏、关注再走呗 ^_^
微信公众号:草帽Lufei
掘金:草帽lufei
